

Traditionally, marketing and web development are seen as two separate fields. As a marketer with six years of experience, I’ve managed content, optimized campaigns, worked on SEO, and edited pages using ready-made platforms. That familiarity with the WordPress dashboard gave me a solid foundation when I decided to take the next step: put all the pieces together and build my own platform from scratch.
Many guides promise that you can build a website over a weekend or even within a few hours. In reality, a reasonable timeframe for creating a good website is around two to six weeks, depending on the type of site you’re building. A simpler business website may take around two weeks, while an e-commerce website or a more advanced structure can easily take up to six weeks. In my case, the entire process took roughly three weeks.
If you prefer to work at a more relaxed pace and dedicate only one or two hours a day alongside your other responsibilities, the process can naturally stretch over three months before every detail is properly polished.
Below is a complete, well-documented guide based on my own experience, covering the processes and workflows that can help you keep costs under control while still launching a solid website.
Step 1: Infrastructure, Local Development, and Data Protection
Every web project starts with setting up a solid technical foundation and securing your name online before the website goes public.
✔ Choosing the Platform → WordPress
As of October 7, 2026, according to W3Techs, WordPress powers approximately 40% of all websites on the internet. It is a free and highly flexible content management system.
What types of websites can you build with it? Everything from niche blogs and service-based business websites to large consulting or agency platforms and online stores of different sizes.
+ E-commerce Website →WooCommerce for Online Stores
If your website involves selling products, WordPress can be turned into a full online store using the free WooCommerce plugin.
Capabilities depending on your budget: WooCommerce itself is an extremely powerful platform. However, if you start with an affordable hosting plan costing around $50–$60 per year, you will naturally be limited by the server resources included in that plan.
A budget hosting package like this can comfortably support a small to medium-sized store with a catalogue of around 300–500 products.
Why limitations appear: Every product adds data to the database, especially when it comes with variations such as sizes or colours. When customers search for products, use filters, or add items to their cart, shared server resources can come under significant pressure.
Once you go beyond roughly 300 products, the website may begin loading more slowly or become unstable during traffic spikes.
For a larger catalogue, you will eventually need to move to a more powerful hosting package, which naturally costs more. In many cases, you may also need help from a developer to optimize the database, automate synchronization with accounting or inventory management systems, and handle larger data flows.
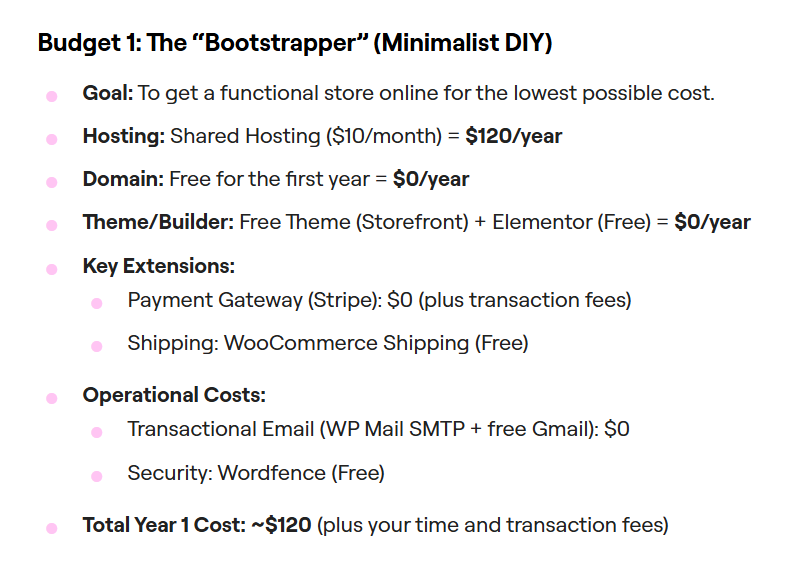
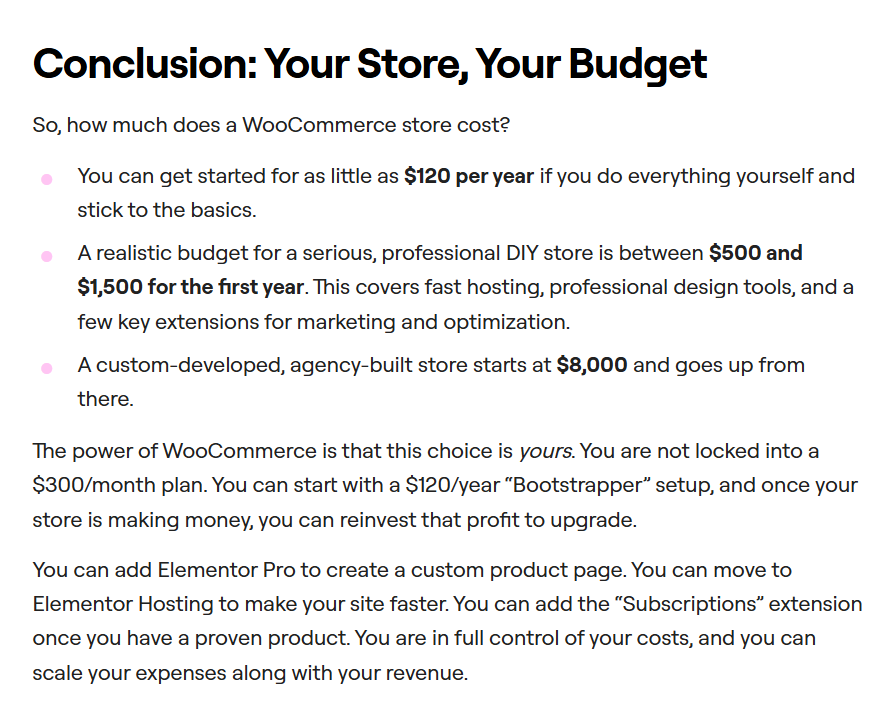
Here you can find more data, pricing information, and details from Elementor about building an online store with WooCommerce and WordPress:
✔ Local Development with LocalWP — Your Private Testing Environment
Instead of paying for web hosting from day one, the most practical approach is to create a website privately first. LocalWP is a free application that you install directly on your computer.
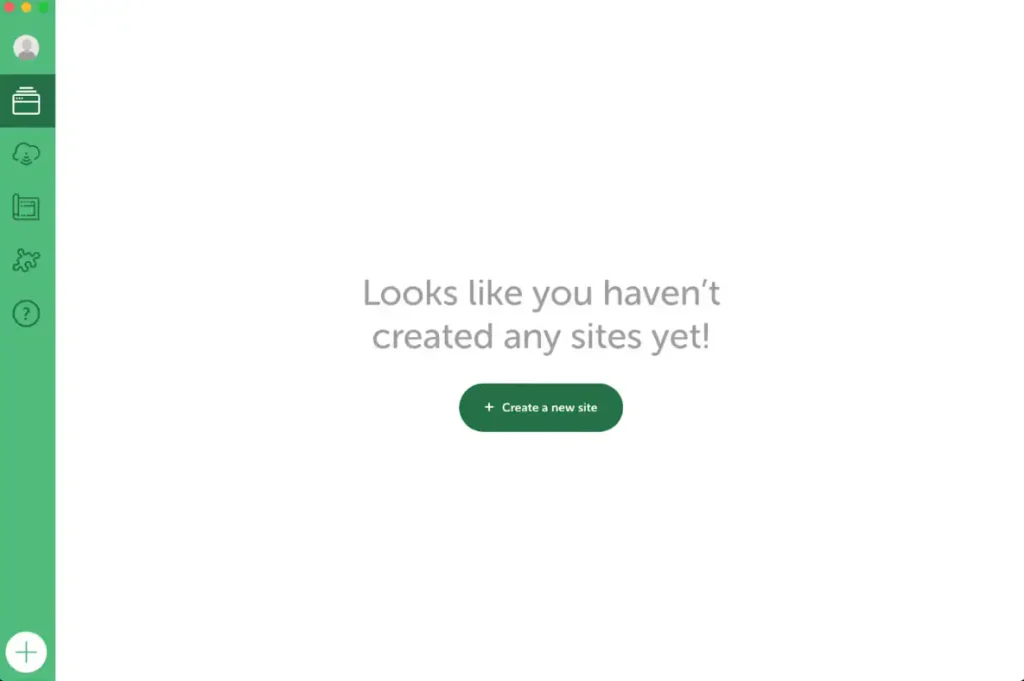
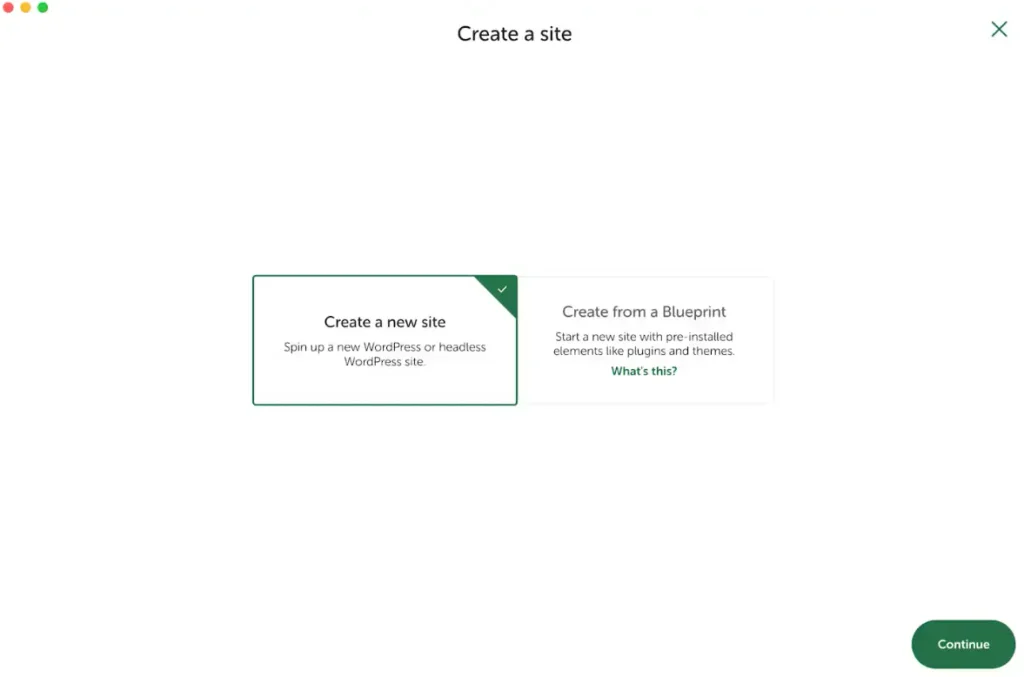
How WordPress and LocalWP work together: When you open Local on your computer and click the green “Add Local Site” button, the application automatically creates a local server environment on your machine, including PHP and a MySQL database, and installs a fresh copy of WordPress. Your computer effectively becomes the host for the website.
You can access the WordPress admin panel directly through the Local application while your website remains safely under construction, offline and hidden from the public. This gives you room to experiment, learn, and make mistakes without anyone seeing the unfinished version.
✔ Checking Your Domain Name
While working on your website in Local, you should also secure your web address, for example: mybestsite.com
Marketing tip: Keep the domain name short, memorable, and closely connected to your business or brand. Avoid hyphens and numbers whenever possible.
Where and how to check it: Use trusted platforms such as Domain.com, Namecheap, Hostinger, or Bluehost. Enter the domain name you want into their search bar to check availability. I also recommend searching for it on Google using: site:example.com This can help you determine whether the domain has been used before and give you an idea of its previous history.
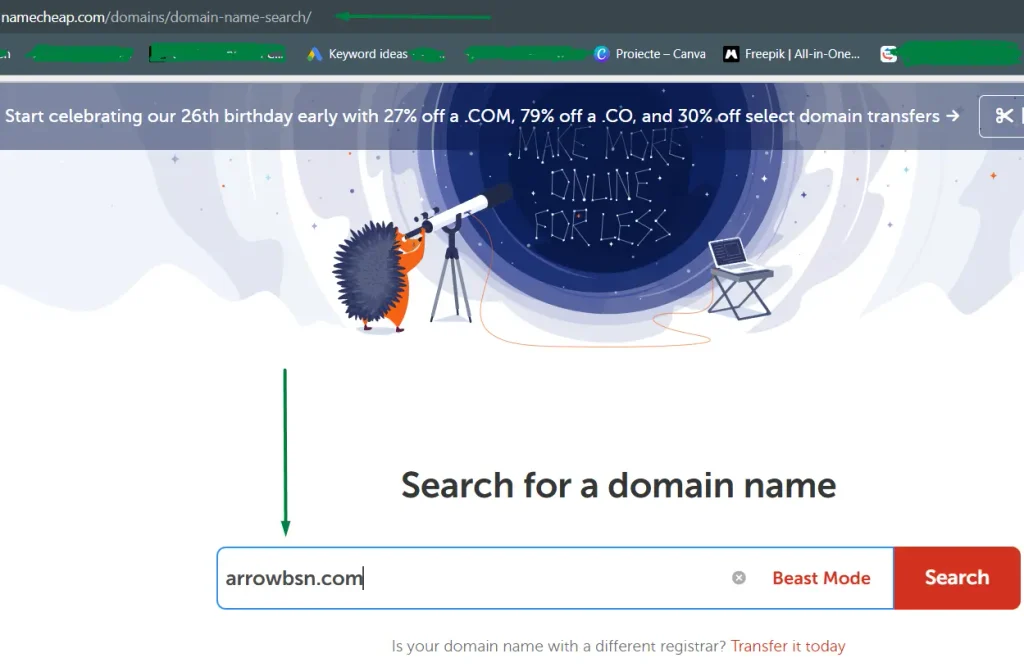
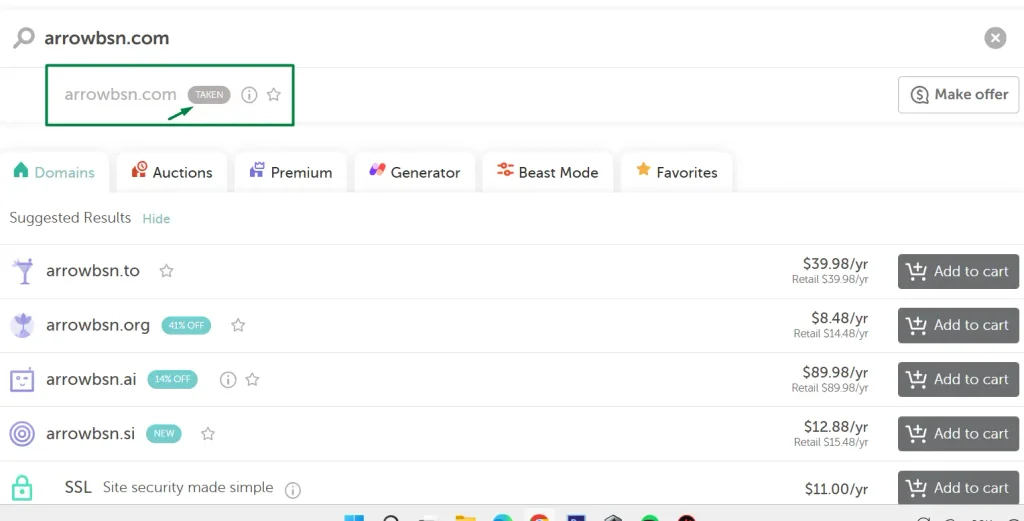
Note: Hosting packages often include a free domain for the first year.
✔ Safe Backups
It is important to start making backups from the very beginning, even while you are still working locally on your computer. While learning and configuring plugins, it is easy to make a mistake that breaks part of the website. If you have a backup plugin configured from day one, you can restore a previous version very quickly and potentially save hours of work.
For the long-term safety of your website, both locally and later on the live version, use one reliable backup solution. My recommendation is:
UpdraftPlus: One of the established solutions I recommend. It allows you to schedule automatic backups, for example weekly backups for website files and daily backups for the database.
Where your backups should be stored and how much space they use: Never keep your only backups on the same server as your website. If the server fails, you could lose both the website and the backups at the same time. Configure UpdraftPlus to automatically send your backup archives to an external cloud service such as Google Drive or Dropbox. A typical business website may take up somewhere between 200 MB and 1 GB.
🔄 Other Reliable Backup and Migration Options
- All-in-One WP Migration: Widely considered one of the easiest migration tools in the WordPress community and designed specifically with beginners in mind.
- WPvivid Backup and Migration: A very generous all-in-one solution that includes several features for free that other plugins may charge for. It is a strong option if you want automation without additional costs.
Step 2: Visual Design with Elementor Pro
Once WordPress is installed locally and protected with backups, you can move on to the visual side of the website. For this workflow, we use Elementor, an intuitive drag-and-drop website builder that lets you adjust the design separately for desktop, tablet, and mobile.
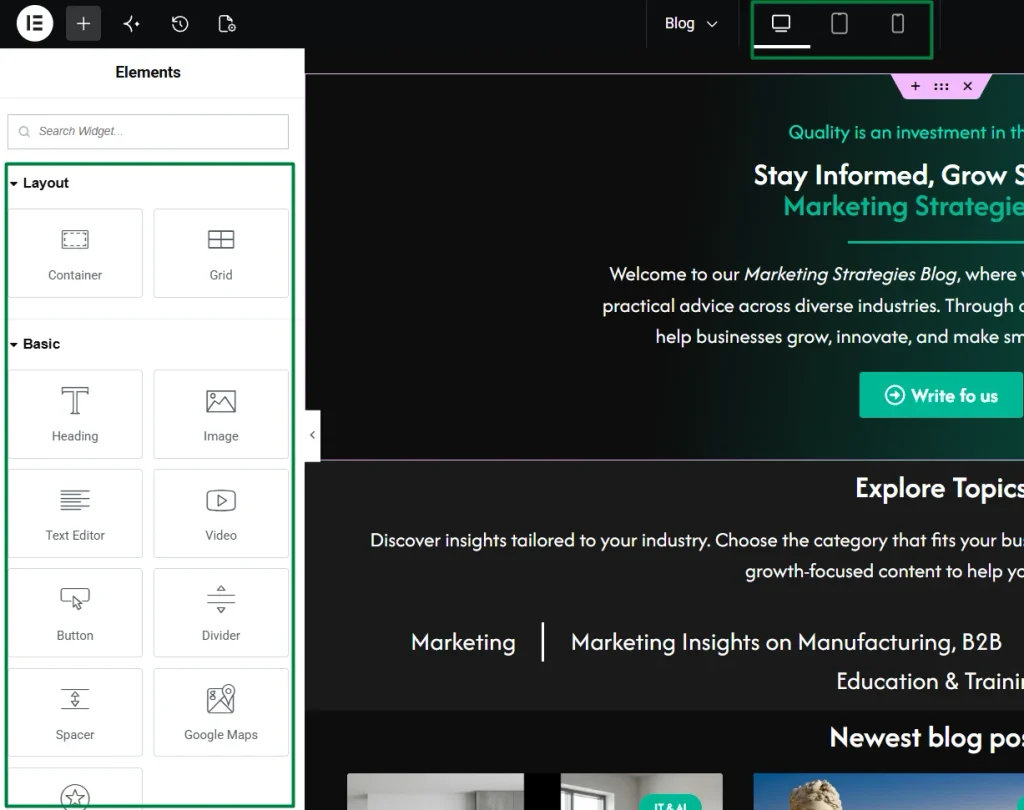
Design Recommendation: Do not rely entirely on the default WordPress or Elementor templates. Otherwise, your website may end up looking very similar to thousands of other websites built with the same templates. My recommendation is to search Pinterest for: web design layouts [your niche]. Save websites and layouts that you like in terms of structure, colour palette, typography, and overall visual direction. Use those references as inspiration and as a guide when building a more premium, custom-looking website.
To give yourself as much design freedom as possible, I recommend installing the free Hello Elementor theme. Think of it as a blank canvas. It does not impose heavy menus, predefined colours, or a specific visual style.
Speed Recommendation: Keep your website design as clean and minimal as possible. An overly busy website can quickly overwhelm the visitor. More importantly, make sure all images are optimized before uploading them. Whenever appropriate, save them in a modern format such as WebP and compress them beforehand. Large, poorly optimized images are one of the biggest enemies of website performance.
The cleaner the design and the lighter the images, the faster the website can load, improving both user experience and SEO performance.
✔ Elementor Pro Plans — Which One Should You Choose?
For a professional-looking website, I recommend using Elementor Pro.
- Essential Plan — around $60/year: For a business website, blog, or service-based website, this plan is more than enough in most cases. It includes 57 Pro widgets, the Theme Builder, which allows you to create one global Header and Footer and apply them across the entire website, the Form Builder for creating contact forms directly inside Elementor, and Dynamic Content.
- Advanced Solo — around $85/year: Includes everything above, plus more advanced features useful for larger projects and online stores, including: Popup Builder, Custom Code and CSS, eCommerce functionality, and Collaborative Notes, which allows clients or team members to leave comments directly on the design. For a small to medium-sized online store, this is the plan I would recommend.
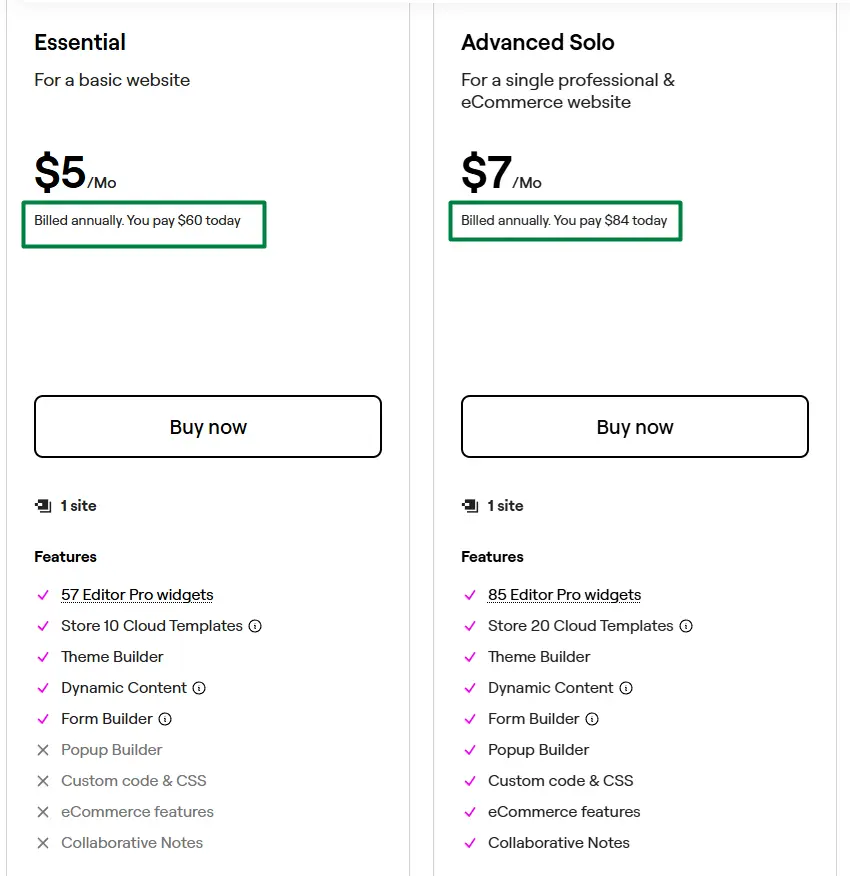
⚠️ P.S. The $60 Plan Does Not Include Custom CSS
The entry-level package does not include Elementor’s native Custom CSS option (the dedicated field inside Elementor where developers can write styling code directly for individual elements). However, in most situations, you do not necessarily need custom CSS. Elementor Pro already offers a wide range of visual controls inside the Style tab for things such as margins, shadows, typography, alignment, colours, and much more. You can build a very polished website using the visual controls alone.
If you have a specific case where you need to modify the design through code, WordPress also allows you to add CSS using free external methods, such as: Appearance → Customize → Additional CSS. See: How to Add Custom CSS in Elementor
However, when two CSS rules target the same element, the browser decides which one takes priority based on the CSS cascade, selector specificity, rule order, and, in some cases, the use of !important. For this reason, custom CSS can sometimes be overridden by Elementor styles, the active theme, or other extensions.
To avoid breaking your design and to understand how these rules interact, I recommend reading the following resources before experimenting:
- CSS basics in Elementor: Read Elementor’s official guide explaining what CSS is and how visual styling rules work on a website.
- Why isn’t your CSS working? Read Elementor’s official Custom CSS troubleshooting guide to understand why another stylesheet may override your modifications, including the concept of CSS specificity.
- How CSS priorities work: Read the detailed tutorial Why Your Custom CSS Isn’t Working from LTheme, which explains how CSS priorities and stylesheet loading can affect the code you write.
Step 3: Marketing and Multilingual Plugins
✔ Code Snippets (Free): A general-purpose snippets manager that allows you to safely add custom integrations, including tracking codes such as Google Analytics or Meta Pixel, without manually editing theme files and risking breaking the website.
✔ Polylang + Connect Polylang for Elementor (Free): A practical combination for building a multilingual website in languages such as Romanian, English, and French. Polylang handles the multilingual structure, while the Elementor integration helps keep the design consistent from one language version to another while the content changes.
✔ Rank Math SEO (Free): A simple real-time checklist that helps you handle basic on-page SEO optimization for your pages and written content.
Step 4: Choosing Fast and Affordable Web Hosting
To launch your website on the internet, you need a hosting package suitable for WordPress.
You can choose shared WordPress-optimized hosting from established global or local providers. Entry-level plans can offer solid performance for around $50–$60 for the first year, with examples including starter plans from Hostinger, DreamHost, and Namecheap. These packages often include a free domain for the first year as well.
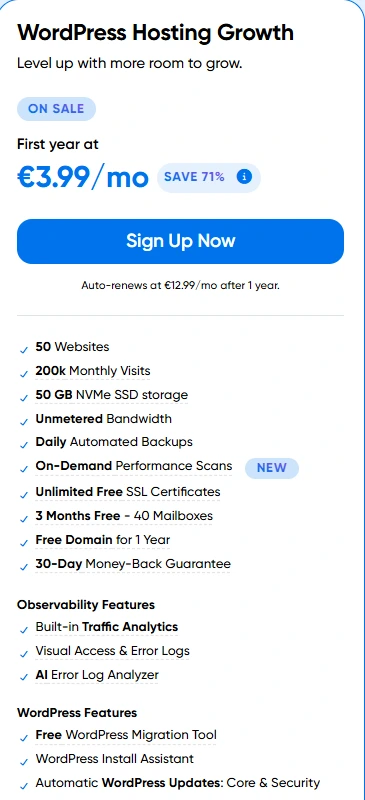
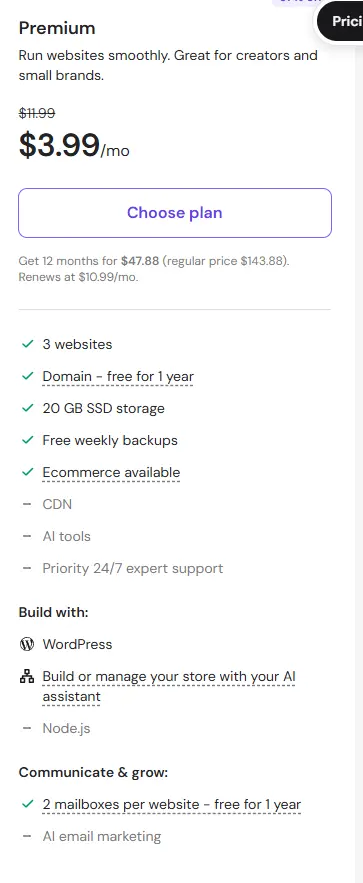
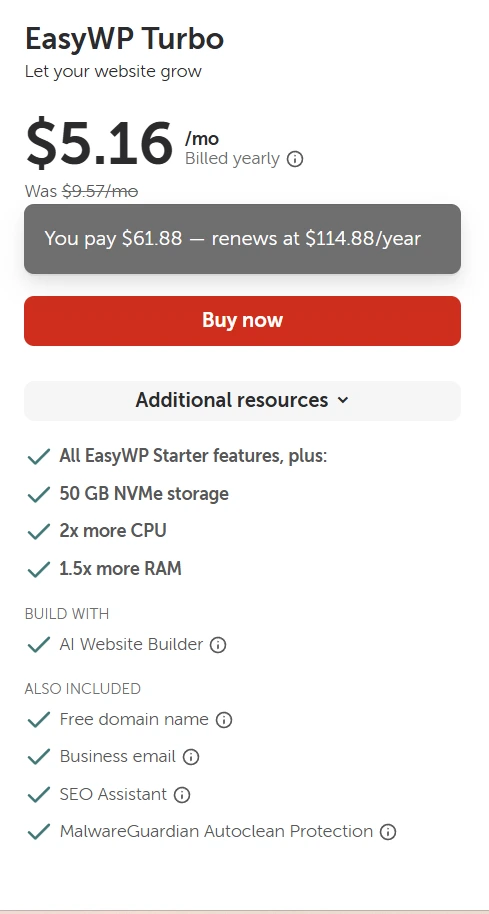



SSL/HTTPS: Check whether your hosting plan includes a free SSL certificate and automatic HTTPS activation. Most modern hosting providers include this. For example, EasyWP offers free SSL through Let’s Encrypt. If your hosting provider does not include SSL, you should install a certificate separately before launching your website.
REMEMBER: Choosing the right hosting provider and making sure the hosting plan actually matches the needs of your website is one of the most important decisions in the entire project, maybe the most important. Good hosting combined with properly optimized website elements can make the difference between a fast, stable platform and a problematic one. Making the right decisions at this stage can help you avoid technical issues later and provide a much smoother experience for everyone visiting your website.
Step 5: The Big Migration (Taking Your Website Live)
Once the local version of the website is finished and you have purchased your live hosting package, the next step is transferring the website to the server.
✔ An Efficient Migration Process
Forget about manually transferring hundreds of folders through complicated hosting panels. One of the easiest and safest approaches is to use a migration or backup plugin.
- Install a migration plugin such as WPvivid Migration on the WordPress installation running locally on your computer.
- Generate a
.ziparchive containing the website and download it to your computer. - On the new live hosting account, install a fresh copy of WordPress, install WPvivid, upload the archive, and click Restore.
Within a short amount of time, your local website is transferred to the live server and becomes available online.
⚠️ Golden Rule for Keeping WordPress Clean: You only need the migration plugin while you are actually migrating the website. Once the site is live and working properly, remove the migration plugin if you no longer need it.
Keep only the backup solution you use for scheduled daily or weekly backups.
Step 6: Website Security and the Cloudflare Shield
This is the final stage. Once your website is live, you need to add several layers of protection against malicious traffic, automated attacks, and unauthorized access.
✔ Securing Your Website with Cloudflare — Free Plan
One important external security measure (although optional, especially if your hosting provider already offers advanced security) is placing your website behind Cloudflare. Cloudflare offers a free plan.
- How it works: Go to the account where your domain or hosting DNS is managed and replace the default nameservers with the nameservers provided by Cloudflare.
- Main benefits: Cloudflare acts as a layer between the internet and your web server. It provides significant protection against attacks such as DDoS, helps filter unwanted bot traffic, and uses a global CDN network to serve website resources from servers around the world. This can improve loading times for international visitors, even when the website itself is hosted on a relatively affordable hosting package.
⚠️ What If You Do Not Use Cloudflare?
If you decide not to use Cloudflare and your hosting provider does not already offer a WAF, rate limiting, or other server-level security features (although many providers now include some of these) you may want an additional WordPress security layer. Plugins such as Solid Security or All-in-One Security (AIOS) are common options.
Be careful with the configuration, especially on low-cost hosting. Large security plugins may include real-time file scanning, database monitoring, and other resource-intensive features. On budget hosting, enabling every available scanning feature at the same time can significantly increase CPU and memory usage, which may slow the website down or cause instability.
If you use these tools, start with the essential protections, such as:
- IP blocking
- brute-force protection
and keep resource-intensive deep scanning disabled unless you actually need it and your server can handle it.
✔ Securing WordPress — Essential Plugins and Settings
Whether or not you use Cloudflare, I recommend adding several security measures inside WordPress itself.
- Two Factor Authentication — 2FA (Free): Requires an additional code from your phone, for example through Google Authenticator, when logging in. Even if someone discovers your password, the password alone is no longer enough to access the website.
- WPS Hide Login (Free): Changes the default login address from something predictable such as:
://site.com/wp-admin/, to a custom address such as://site.com/access-login-secret. This helps reduce automated traffic targeting the standard WordPress login URL.
EasyWP + WPS Hide Login: Why the Custom Login URL May Return a 404 Error
If you use WPS Hide Login together with Namecheap EasyWP, the custom login URL may appear to work normally, but after entering your password or 2FA code, WordPress may redirect you to a 404 page instead of the admin dashboard.
At first, the issue may look like a conflict involving the 2FA plugin, WPS Hide Login, or even the caching system. On EasyWP, however, the cause can be much simpler.
The cause
On Namecheap EasyWP, the custom login URL created with WPS Hide Login should contain the word:
login
Namecheap mentions this requirement in its EasyWP documentation and warns that a custom URL that does not contain the word login may return a 404 error or a browser cookies-related error.
For example, instead of: /private-access/ use a slug such as: /private-login/ or: /secure-login-area/
Do not use these exact examples on a real website. Create your own private slug that is difficult to guess.
How to fix the problem
Open the WPS Hide Login settings and change the custom URL so that the slug contains the word login. After saving the change, test the complete authentication flow again: Custom URL → username + password → 2FA → WordPress Dashboard.
In most cases, no changes to the 2FA plugin are required. If you use Cloudflare or another caching system, also make sure that the custom login URL, wp-login.php, and the /wp-admin/ area are excluded from full-page caching.
Important
This is not a general WPS Hide Login rule for every WordPress hosting provider. It is a specific requirement of the EasyWP hosting environment.
If you use WPS Hide Login on another hosting provider, check the provider’s documentation before assuming that the same rule applies.
Also remember that changing the standard WordPress login URL should only be treated as an additional layer of protection. It does not replace 2FA, strong passwords, login attempt limiting, regular updates, or a properly configured WAF.
Source: Namecheap’s official EasyWP documentation states that the custom URL configured through WPS Hide Login should contain the word login.
✔ Disable File Editing from the WordPress Dashboard
Another effective security measure is disabling direct code editing from inside the WordPress admin dashboard. If an attacker manages to gain administrator-level access, modifying theme or plugin files would otherwise become one possible way of injecting malicious code.
How to Configure It: Access your website files either through the hosting file manager or through a direct server connection. Open the main website directory and locate the important WordPress system file: wp-config.php. Add the following line immediately before ,,That's all, stop editing!”:
define('DISALLOW_FILE_EDIT', true);The Result: The built-in WordPress code editor disappears from the admin dashboard. Future file changes must be made through direct server access rather than from inside WordPress, removing one potential attack vector if an admin account is compromised.
✔ Anti-Spam Protection (Two Effective Options)
If you begin receiving spam messages, fake registrations, or automated comments, adding an anti-spam solution can be very effective.
- Option A (With Cloudflare): Install Simple CAPTCHA with Cloudflare Turnstile and configure it with Cloudflare. It adds an intelligent, low-friction verification layer to your forms, helping distinguish legitimate visitors from automated bots without forcing users to solve image-based CAPTCHA challenges.
- Option B (Without Cloudflare): Install the free WP Armour (Honeypot Anti Spam) plugin. It inserts an invisible honeypot field into Elementor forms. Human visitors do not see the field, while automated bots often interact with it and can therefore be blocked. It is a lightweight alternative that does not rely on heavy Google CAPTCHA scripts.
✔ Speed Control — Optimization and Cache Management
This is where caching becomes important. Caching stores static copies of your website pages so the server does not have to rebuild the same output through WordPress and Elementor every time someone visits the page. Depending on whether you use an external layer such as Cloudflare, there are two main optimization scenarios.
Scenario 1: If You Do NOT Use Cloudflare
If you do not use Cloudflare and your hosting provider does not offer a built-in page caching system, or if the website simply feels too slow, adding a WordPress caching plugin can help reduce pressure on your server. I recommend two options:
- WP Super Cache (Free & Simple): Created by the company behind WordPress. It is easy to use and includes a straightforward “Delete Cache” option that is useful when Elementor changes do not immediately appear on the live site.
- W3 Total Cache (Free & Advanced(: A powerful optimization tool for budget hosting environments, although it requires more care during configuration.
Scenario 2: If You DO Use Cloudflare (Free Plan)
If your hosting provider does not include effective page caching, or if the website is still too slow, Cloudflare caching can help. When you connect your domain to Cloudflare, website traffic passes through Cloudflare’s network before reaching your hosting server. In its standard configuration, Cloudflare can serve static website resources such as images, CSS files, and JavaScript from its global network. This reduces the number of requests that need to reach the origin server and can improve loading times for visitors.
Custom “Cache Everything” Rule: Inside the Cloudflare dashboard, under Cache Rules, you can configure more aggressive caching. Cloudflare allows you to create rules that make certain HTML pages eligible for caching at the edge. This can further reduce requests to the hosting server and improve performance, particularly for public pages that do not change frequently.
However, this setup must be done carefully. You should not apply a broad “Cache Everything” rule without proper exclusions because certain WordPress areas are dynamic and should never be served from a cached HTML copy.
Depending on your website, full-page caching should exclude:
- WordPress administration and login areas
- pages or sessions belonging to logged-in users
- pages and endpoints that generate dynamic content
- cart, checkout, and customer account pages on WooCommerce websites
- any other website functionality that depends on personalized or real-time content
For a simple business website, if you are not comfortable configuring cache rules, it is safer to keep Cloudflare’s standard caching behaviour and use a properly configured WordPress or server-side caching system rather than forcing every HTML page into cache.
How to Clear the Cache Correctly: If you make changes in Elementor, Cloudflare may continue serving the previously cached version of the page. Go to: Cloudflare → Caching → Configuration and use either: Purge Everything — clears the global cache; or Custom Purge — clears only the specific URL you have updated, leaving the rest of the cache untouched.
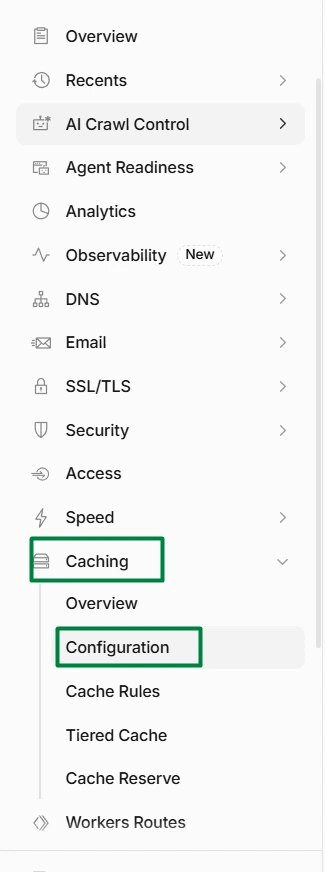

I recommend reading more about Cloudflare rules for WordPress here.
🚨 One Important General Recommendation: Plugin Hygiene
Golden Rule: Keep only the plugins you actually need, choose reliable plugins, and keep them updated. This helps maintain both performance and security.
Every additional plugin introduces more code that WordPress may have to load or maintain. Too many unnecessary plugins can slow down the website, and outdated or abandoned plugins may contain security vulnerabilities. Keep only the plugins you genuinely need and update them regularly.
💰 Estimated Total Cost — First Year
Here is an example of what it can cost to be your own website developer during the first year:
| Component | What I used / recommend | Estimated first-year cost |
|---|---|---|
| Hosting + Email + Domain | Entry-level WordPress hosting; many plans include the domain during the first year | $50–$60 |
| Elementor Pro | Essential for a standard business website or Advanced Solo for more advanced/eCommerce features | $60–$85 |
| Security | Cloudflare Free, Two Factor, WPS Hide Login and basic WordPress hardening | $0 |
| SEO | Rank Math Free | $0 |
| Translations | Polylang + Connect Polylang for Elementor | $0 |
| Developer / Custom Code | Built and configured independently | $0 |
| Total – Website | Without eCommerce extras | Approx. $110–$150 |
The WordPress Stack Used in This Guide
| Purpose | Tool |
|---|---|
| CMS | WordPress |
| Local development | LocalWP |
| Theme | Hello Elementor |
| Page builder | Elementor Pro |
| Multilingual setup | Polylang + Connect Polylang for Elementor |
| SEO | Rank Math SEO |
| Backups | UpdraftPlus |
| Migration | WPvivid Backup & Migration |
| CDN / WAF / Edge Cache | Cloudflare |
| 2FA | Two Factor |
| Custom login URL | WPS Hide Login |
| Anti-spam | Cloudflare Turnstile |
| Hosting in this case study | EasyWP |
Conclusion
To build a website is no longer necessarily a major technical barrier. Today, it is largely an exercise in strategy, organization, and choosing the right tools. By using the right tools in the right order, you can avoid large upfront development costs and maintain much more control over your own online presence. What you really need is discipline, patience, and a well-structured plan.
Read more articles about Marketing, IT & AI on our blog.

Author: Isabela Pegza. Marketing Specialist: Analysis & Strategy, SEO, Content Marketing, Google Ads.